Install the Operating System

  1. Before you (the administrator) install the operating system, configure the server as follows:
    • Data on your hard drive of your server will be overwritten during the installation process. Therefore, make sure that the hard drive data is backed up.
    • Enter BIOS, and enable CPU VT and hyper-threading (HT).
    • Enter the RAID controller and configure the RAID levels to provide data redundancy.
    • Set USB drives as the first device to boot in the boot sequence.
  2. After you complete the preceding configurations, reboot or power on the server, and enter the installation wizard.

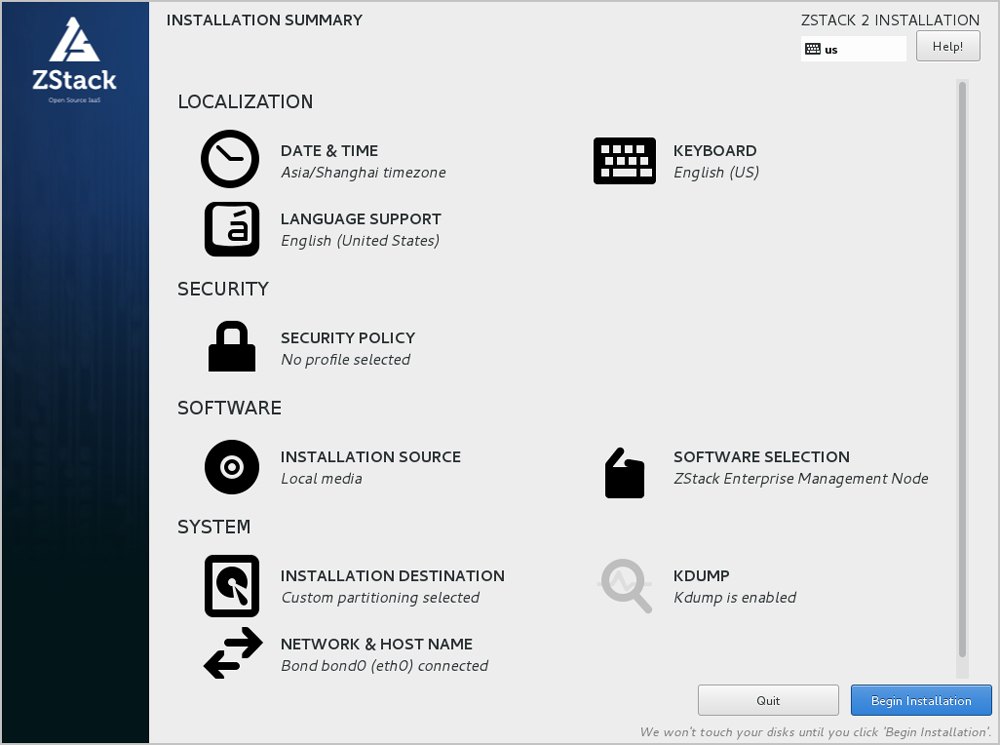
    On the ISO installation page, the Install ZStack option is selected by default, and then the operating system starts to install, as shown in USB Drive Guide Page.

    Figure 1. USB Drive Guide Page


    Note:
    • As shown in the preceding figure, ZStack allows you to install the operating system by using one of the following methods: install ZStack, install ZStack by using VNC, or install ZStack in text mode.
    • We recommend that you use the Install ZStack method.
    • Some servers that do not have VGA ports can only be connected through serial ports. In this case, you can install the operating system in text mode, or by using VNC.
  3. On the installation summary page, some options are preconfigured as below. You can modify the configuration as needed.
    • DATE & TIME: UTC/GMT+8. We recommend that you check the date and time of your host in advance and then configure them to the current date and time.
    • LANGUAGE SUPPORT: English (United States)
    • KEYBOARD: English (United States)
    As shown in Installation Summary Page.
    Figure 2. Installation Summary Page


  4. Select an installation mode.
    On the installation summary page, click SOFTWARE SELECTION, and go to the software selection page, as shown in Select Installation Mode.
    Figure 3. Select Installation Mode


    The available installation modes are as follows:
    1. ZStack Enterprise Management Node
      Note: We recommend that you select this mode for the initial installation.
    2. ZStack Community Management Node
    3. ZStack Compute Node
    4. ZStack Expert Node
      Note: If you select No ZStack Local Repo on the right, the ISO will not be copied and no internal repositories will be produced. This saves the installation time efficiently.
  5. Configure disk partitioning.
    On the installation summary page, click INSTALLATION DESTINATION, and go to the disk partitioning configuration page, as shown in Default Setting - Automatically Configure Partitioning.
    Figure 4. Default Setting - Automatically Configure Partitioning


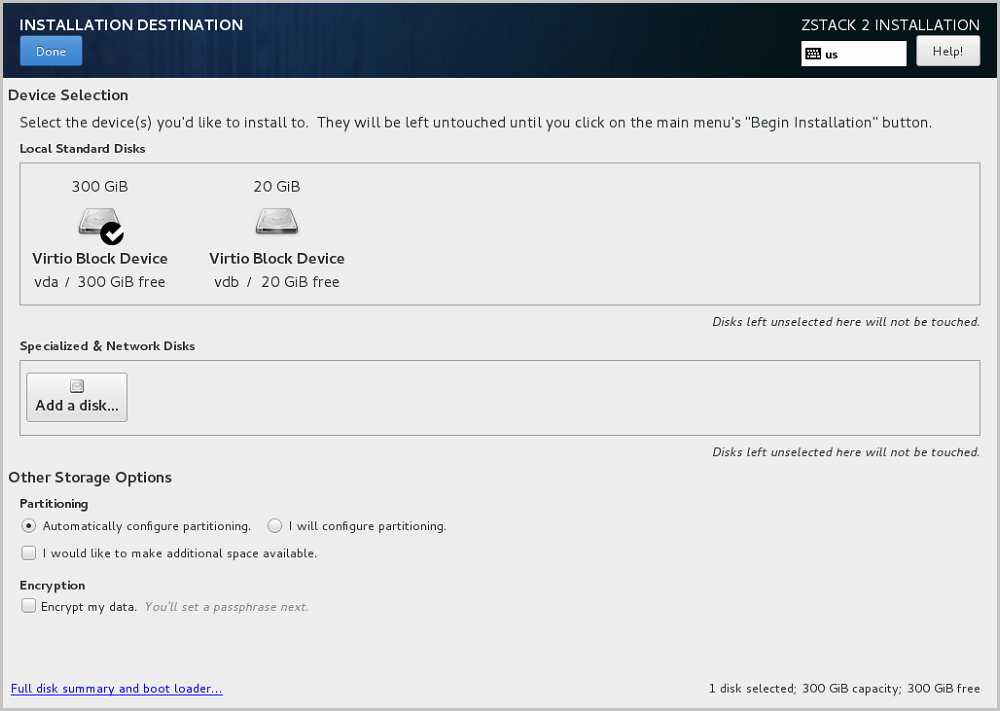
    Note: When you install the OS, we recommend that you select only the hard disk or disks that are required by the system disk. You are not advised to select the hard disks that have special usage.

    Default setting: Automatically configure partitioning. We recommend that you use the default setting to automatically configure the disk partitioning.

  6. Configure the network.
    1. Configure the NIC.
      On the installation summary page, click NETWORK & HOST NAME, and go to the NIC configuration page, as shown in NIC Configuration.
      1. Select the NIC to be configured, for example, eth0.
      2. Check the obtained DHCP address.
      Figure 5. NIC Configuration


    2. If eth0 cannot obtain the DHCP address, manually configure a static IP address for eth0.
      1. On the NIC Configuration page, select Ethernet (eth0), click Configure..., and go to the eth0 configuration page, as shown in Configure a Static IP Address of eth0.
      2. Choose the IPv4 Settings tab page under eth0.
      3. From the Method drop-down list, select Manual.
      4. Click Add to add new configuration items.
      5. Configure the IP address of the NIC as needed.
      6. Click Save.
      Figure 6. Configure a Static IP Address for eth0


    3. Configure eth0 to automatically connect to the network.
      1. On the NIC Configuration page, select Ethernet (eth0), click Configure..., and go to the eth0 configuration page, as shown in Configure eth0 to Automatically Connect to Network.
      2. Choose the General tab page.
      3. Verify that you selected Automatically connect to this network when it is available.
      4. Click Save.
      Figure 7. Configure eth0 to Automatically Connect to Network


  7. After the network configuration is completed, go back to the installation summary page, and click Begin Installation.
    As shown in Begin Installation.
    Figure 8. Begin Installation


  8. Set ROOT PASSWORD during the automatic installation process.
    As shown in Configuration.
    Figure 9. Configuration


  9. After the installation is completed, click reboot. Then, you can start and enter the system of ZStack Custom c76.
  • If you select ZStack Enterprise Management Node, ZStack Community Management Node, or ZStack Compute Node, the system will automatically install the corresponding ZStack Installation Package after rebooting.
  • If you select ZStack Expert Mode, the system will enter a shell interface after rebooting. This method is applicable to advanced users who want to install the system in a custom way.

Back to Top

Download

Already filled the basic info?Click here.

Enter at least 2 characters.
Invalid mobile number.
Enter at least 4 characters.
Invalid email address.
Wrong code. Try again. Send Code Resend Code (60s)

An email with a verification code will be sent to you. Make sure the address you provided is valid and correct.

Download

Not filled the basic info yet? Click here.

Invalid email address or mobile number.

Email Us

contact@zstack.io
ZStack Training and Certification
Enter at least 2 characters.
Invalid mobile number.
Enter at least 4 characters.
Invalid email address.
Wrong code. Try again. Send Code Resend Code (60s)

Email Us

contact@zstack.io
Request Trial
Enter at least 2 characters.
Invalid mobile number.
Enter at least 4 characters.
Invalid email address.
Wrong code. Try again. Send Code Resend Code (60s)

Email Us

contact@zstack.io

The download link is sent to your email address.

If you don't see it, check your spam folder, subscription folder, or AD folder. After receiving the email, click the URL to download the documentation.

The download link is sent to your email address.

If you don't see it, check your spam folder, subscription folder, or AD folder.
Or click on the URL below. (For Internet Explorer, right-click the URL and save it.)

Thank you for using ZStack products and services.

Submit successfully.

We'll connect soon.

Thank you for using ZStack products and services.