Install Operating System

  1. Configure the server.
    • Make sure that the data on the disks of the server is backed up. The data will be overwritten during installation.
    • Enter BIOS and enable the virtualization technology and hyper-threading options for CPU.
    • Enter the RAID configuration page and configure the RAID level to provide a data redundancy mechanism that suits your business needs.
    • Place the system startup disk in the first boot order.
  2. Select the boot item.

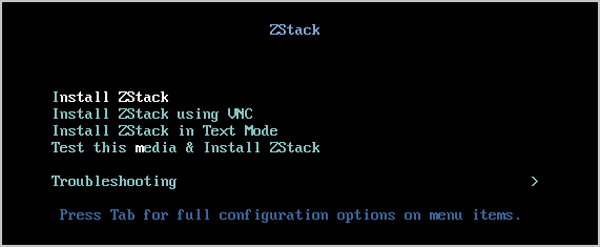
    On the ISO system boot interface, select the default option and then install the operating system.

    Figure 1. System Boot


    Note:
    • ZStack Cloud provides the following installation methods: (graphic user interface) GUI, virtual network computing (VNC), and character user interface (CUI). We recommend that you use GUI to install the operating system.
    • If the server does not have a VGA connector and only supports serial communication, you can use the VNC or CUI method.
  3. Installation configuration summary.

    The following figure displays system installation configurations. You can specify the configurations based on your needs. The default settings provided by ZStack Cloud are as follows:

    • DATE&TIME: Asia/Shanghai timezone. We recommend that the admin checks the host time and sets to the current timezone and time.
    • LANGUAGE: English (United States).
    • KEYBOARD: English (US).
    Figure 2. System Installation Interface


  4. Select the installation mode.

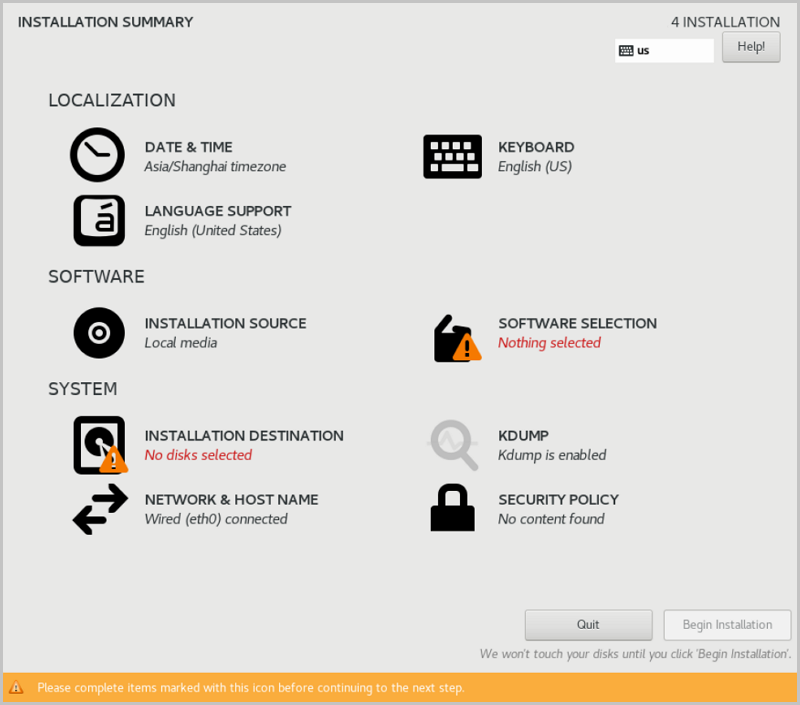
    On the INSTALLATION SUMMARY page, click SOFTWARE SELECTION to enter the SOFTWARE SELECTION page. Select an installation mode on the page.

    ZStack Cloud provides the following installation modes:
    • ZStack Enterprise Management Node
      Note: We recommend that you select this mode in the initial installation.
    • ZStack Community Management Node
    • ZStack Compute Node
    • ZStack Expert Mode
      Note:
      • If you select this mode, after the system is installed, you are redirected to the terminal where you can customize installation of the cloud platform. If you select other modes, after the system is installed, the system automatically installs the cloud platform in the selected mode.
      • No ZStack Local Repo: simplified installation. If you select this item, the ISO image file is not copied during installation and internal repo is not generated.
    Figure 3. Select Installation Mode


  5. Configure disk partitioning.

    On the INSTALLATION SUMMARY page, click INSTALLATION DESTINATION to enter the INSTALLATION DESTINATION page.

    Figure 4. Default Disk Partitioning


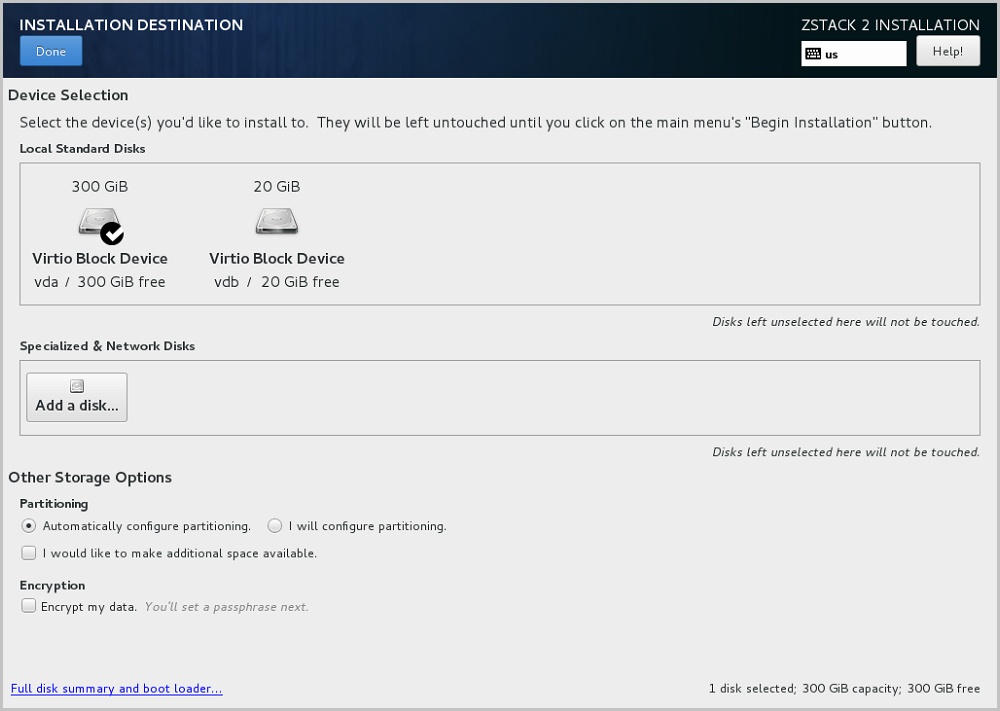
    Note: We recommend that you only configure the system disk on the page. After the system is installed, you can configure other disks.
    ZStack Cloud sets partitioning to Automatically configure partitioning by default. If you want to customize partitioning, set the parameters based on the BIOS boot mode:
    • UEFI mode
      • /boot: stores the core files required for Linux startup. We recommend that you distribute 1 GB to the directory.
      • /boot/efi: stores UEFI boot file. We recommend that you distribute 500 MB to the directory.
      • swap: swap. We recommend that you distribute 32 GB to the swap.
      • /: Linux system root. We recommend that you distribute the rest of the space to the directory.
    • Legacy mode
      • /boot: stores the core files required for Linux startup. We recommend that you distribute 1 GB to the directory.
      • swap: swap. We recommend that you distribute 32 GB to the swap.
      • /: Linux system root. We recommend that you distribute the rest of the space to the directory.
    Note:
    • We recommend that the total disk capacity for ZStack Cloud be greater than 300 GB.
    • In Legacy mode, if the capacity of the system disk is greater than 2 TB, you need to configure the BIOS boot partition for the support of the GPT partition. In UEFI mode, you do not need to configure this item and the GPT partition is supported.
  6. Configure the network.
    This step describes how to configure a static IP address for a NIC and enable auto-activation of NIC. This configuration is used only for proof of concept (POC). In the production environment, we recommend that you configure NIC bonding. For more information, see Network Bonding (Optional)
    1. Configure a static IP address.
      1. On the INSTALLATION SUMMARY page, choose NETWORK & HOST NAME > Ethernet (eth0) > Configure.... Then the Editing eth0 page is displayed. On the page, choose IPv4 Settings > Method > Manual. Then you can manually assign an IP address.
        Note: You can also use DHCP to automatically obtain an IP address.
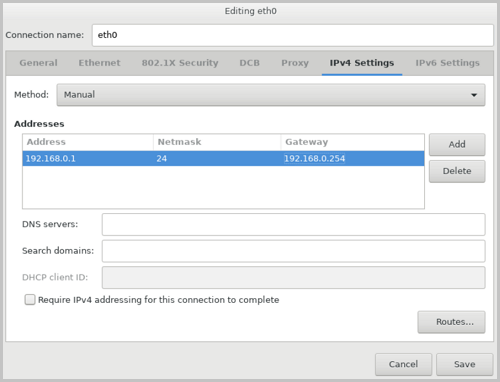
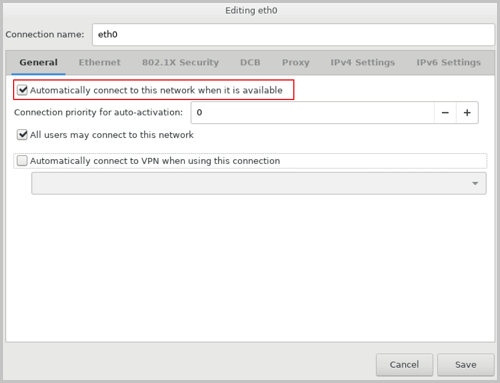
      2. Click Add to add an IP entry, configure the IP address, subnet, and gateway, and then click save to save the configurations.
        Figure 5. Configure Static Address


    2. Configure NIC auto-activation.

      On the Editing eth0 page, choose General > Automatically connect to this network when it is available > Save. Then the auto-activation is enabled.

      Figure 6. Configure NIC Auto-Activation


  7. Start installation.

    Go back to the INSTALLATION SUMMARY page, click Begin Installation to install the operating system.

  8. Set a password.

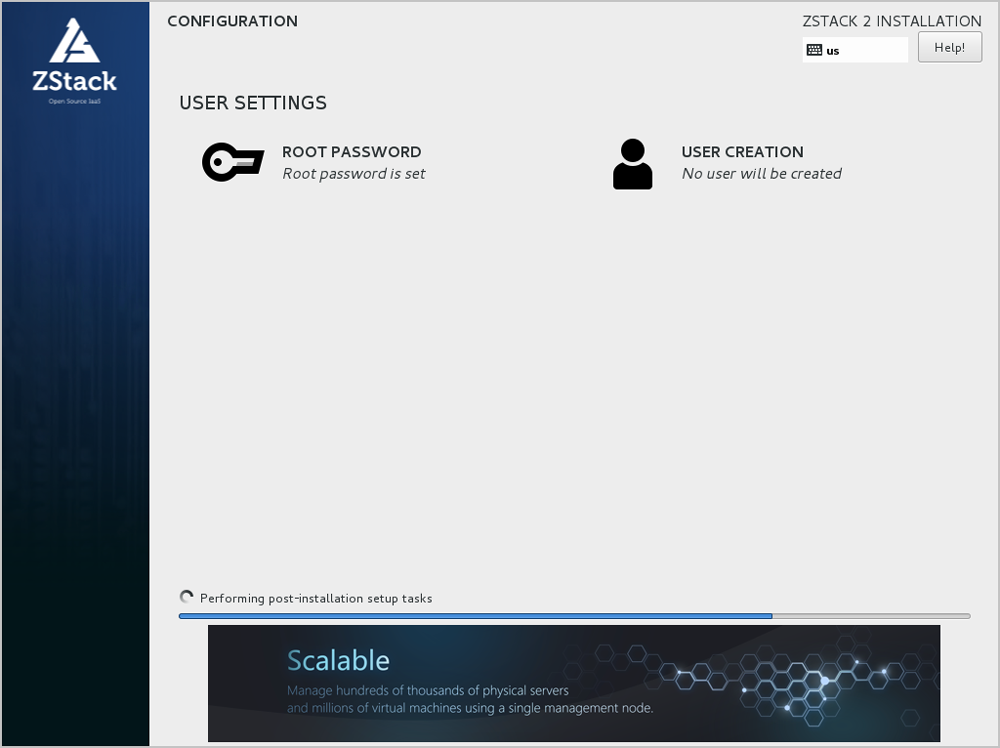
    When the installation is in progress, click ROOT PASSWORD to set a root password.

    Figure 7. Set Password


  9. Enter the system.

    After the system is installed, click Restart and enter the custom system of ZStack Cloud.

Back to Top

Download

Already filled the basic info?Click here.

Enter at least 2 characters.
Invalid mobile number.
Enter at least 4 characters.
Invalid email address.
Wrong code. Try again. Send Code Resend Code (60s)

An email with a verification code will be sent to you. Make sure the address you provided is valid and correct.

同意 不同意

I have read and concur with the Site TermsPrivacy PolicyRules and Conventions on User Management of ZStack Cloud

Download

Not filled the basic info yet? Click here.

Invalid email address or mobile number.
同意 不同意

I have read and concur with the Site TermsPrivacy PolicyRules and Conventions on User Management of ZStack Cloud

Email Us

contact@zstack.io
ZStack Training and Certification
Enter at least 2 characters.
Invalid mobile number.
Enter at least 4 characters.
Invalid email address.
Wrong code. Try again. Send Code Resend Code (60s)

同意 不同意

I have read and concur with the Site TermsPrivacy PolicyRules and Conventions on User Management of ZStack Cloud

Email Us

contact@zstack.io
Request Trial
Enter at least 2 characters.
Invalid mobile number.
Enter at least 4 characters.
Invalid email address.
Wrong code. Try again. Send Code Resend Code (60s)

同意 不同意

I have read and concur with the Site TermsPrivacy PolicyRules and Conventions on User Management of ZStack Cloud

Email Us

contact@zstack.io

The download link is sent to your email address.

If you don't see it, check your spam folder, subscription folder, or AD folder. After receiving the email, click the URL to download the documentation.

The download link is sent to your email address.

If you don't see it, check your spam folder, subscription folder, or AD folder.
Or click on the URL below. (For Internet Explorer, right-click the URL and save it.)

Thank you for using ZStack products and services.

Submit successfully.

We'll connect soon.

Thank you for using ZStack products and services.