Typical Scenario Practice

Scenario: Assume that an online retail has deployed a latest ZStack Private Cloud environment. To meet business needs, the retailer needs to deploy a business VM instance, and wants to use the auto scaling service where an auto scaling group provides scaling activities for the business VM instance based on the load balancing feature.

The auto scaling group enables you to trigger the auto scaling service by using an agent, internal monitoring tool. This scenario takes external monitoring as an example. The following is the detailed procedure to introduce the external monitoring.

Procedure
  1. Create an auto scaling group.
  2. Verify functionalities: elastic self-health, elastic scale-out, and elastic scale-in.
  1. Create an auto scaling group.

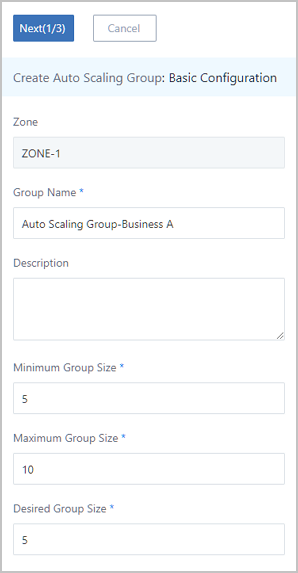
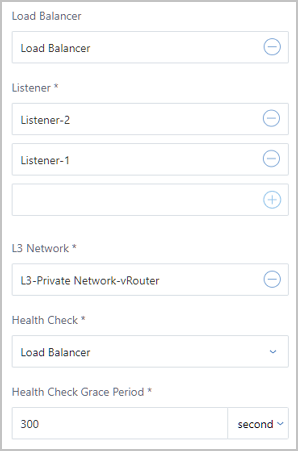
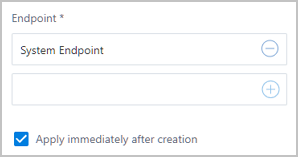
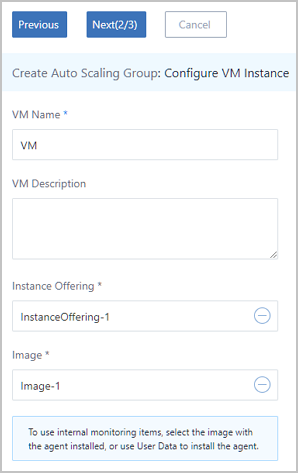
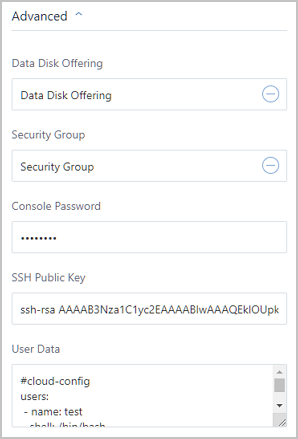
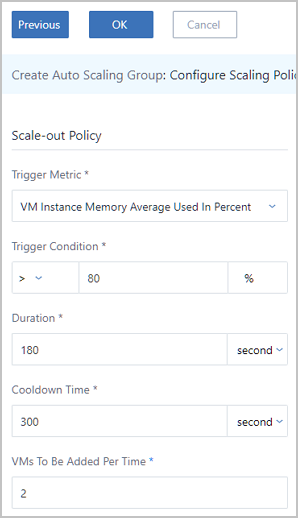
    In the navigation pane of the ZStack Private Cloud UI, choose Resource Pool > Auto Scaling Group. On the Auto Scaling Group page, click Create Auto Scaling Group. On the displayed Create Auto Scaling Group page, create an auto scaling group.

    Create an auto scaling group.

    1. Set the basic information.
      To set the basic information, set the following parameters:
      • Group Name: Enter a name for the auto scaling group, such as Auto Scaling Group-Business A.
      • Description: Optional. Enter a description for the auto scaling group.
      • Minimum Group Size: Enter a number, such as 5.
      • Maximum Group Size: Enter a number, such as 10.
      • Desired Group Size: Enter a number, such as 5.
      • Load Balancer: Select a load balancer that you created.
      • Listener: Select a listener.
      • L3 Network: Select an available network.
      • Health Check: Select the load balancer health check.
      • Health Check Grace Period: Enter a value, such as 300. This value defaults to 300 seconds.
      • Enable alarm notification: Select the checkbox. By doing so, the alarm notification will be enabled.
      • Endpoint: Specify one or more endpoints that you created.
      • Apply immediately after creation: Select the checkbox. By doing so, the auto scaling group will be enabled after you create the auto scaling group.
      Figure 1. Step 1 Set Basic Information


    2. Configure the autoscaling VM instance.
      To configure the autoscaling VM instance, set the following parameters:
      • VM Name: Enter a name for the VM instance, such as VM.
      • VM Description: Optional. Enter a description for the VM instance.
      • Instance Offering: Select an instance offering for the VM instance.
      • Image: Select an image for the VM instance.
      • L3 Network: Default to display the vRouter network that you set in the previous step.
      • Advanced: Make advanced settings for the VM instance as needed.
      Figure 2. Step 2 Configure Autoscaling VM Instance


    3. Configure the auto scaling policies.
      To configure a scale-out policy, set the following parameters:
      • Trigger Metric: Select a trigger metric, such as the average VM memory utilization.
      • Trigger Condition: Set a trigger condition that is greater than 80%.
      • Duration: Set a duration, such as 180 seconds.
      • Cooldown Time: Set a cooldown time, such as 300 seconds.
      • VMs To Be Added Per Time: Enter a value, such as 2.
      To configure a scale-in policy, set the following parameters:
      • Trigger Metric: Default to display the average VM memory utilization.
      • Trigger Condition: Set a trigger condition that is lower than 20%.
      • Duration: Set a duration, such as 180 seconds.
      • Cooldown Time: Set a cooldown time, such as 300 seconds.
      • Removal Policy: Select a removal policy, such as the earliest created VM instance.
      • VMs To Be Removed Per Time: Set a value, such as 2.
      Step 3 is about how to configure the auto scaling policies, as shown in Step 3 Configure Auto Scaling Policy.
      Figure 3. Step 3 Configure Auto Scaling Policy


  2. Verify functionalities: elastic self-health, elastic scale-out, and elastic scale-in.
    • Elastic self-health: The number of healthy VM instances in the auto scaling group continues to stay at 5 or above to ensure the normal functions of your businesses.
      Unhealthy VM instances are automatically deleted in the auto scaling group, as shown in Delete Unhealthy VM Instance.
      Figure 4. Delete Unhealthy VM Instance


    • Elastic scale-out: During Double Eleven, the Spring Festival, and other great events, businesses are skyrocketing, VM instances in the auto scaling group will be automatically added. Specifically, during peak periods, up to 10 VM instances are automatically added, whereby effectively avoiding access latency and excessive resource load, as shown in Elastic Scale-out.
      Figure 5. Elastic Scale-out


    • Elastic scale-in: After the festivals and shopping sprees, the business workload obviously declines. In that case, VM instances need to be automatically removed in time to avoid a waste of resources, as shown in Elastic Scale-in.
      Figure 6. Elastic Scale-in


So far, we have introduced the usage of the auto scaling group.

Back to Top

Download

Already filled the basic info?Click here.

Enter at least 2 characters.
Invalid mobile number.
Enter at least 4 characters.
Invalid email address.
Wrong code. Try again. Send Code Resend Code (60s)

An email with a verification code will be sent to you. Make sure the address you provided is valid and correct.

Download

Not filled the basic info yet? Click here.

Invalid email address or mobile number.

Email Us

contact@zstack.io
ZStack Training and Certification
Enter at least 2 characters.
Invalid mobile number.
Enter at least 4 characters.
Invalid email address.
Wrong code. Try again. Send Code Resend Code (60s)

Email Us

contact@zstack.io
Request Trial
Enter at least 2 characters.
Invalid mobile number.
Enter at least 4 characters.
Invalid email address.
Wrong code. Try again. Send Code Resend Code (60s)

Email Us

contact@zstack.io

The download link is sent to your email address.

If you don't see it, check your spam folder, subscription folder, or AD folder. After receiving the email, click the URL to download the documentation.

The download link is sent to your email address.

If you don't see it, check your spam folder, subscription folder, or AD folder.
Or click on the URL below. (For Internet Explorer, right-click the URL and save it.)

Thank you for using ZStack products and services.

Submit successfully.

We'll connect soon.

Thank you for using ZStack products and services.