Template

This Tutorial includes two types of encapsulation method: Windows and Windows VirtIO. Encapsulation procedures for each method are different. Make sure that you perform relevant operations according to the corresponding method as follows:
  • Windows: Add an image by using Windows platform type. Note that the template with the Windows method has two types of drive: IDE and VirtIO. For more information about how to encapsulate a template with the Windows method, see Windows Template.
  • Windows VirtIO: Add an image by using Windows platform type and enable Virtio. Note that the template with the Windows VirtIO method has only one type of drive: VirtIO. For more information about how to encapsulate a template with the Windows VirtIO method, see Windows VirtIO Template.

Windows Template

To encapsulate a Windows template, follow these steps:
  1. Add an image.
  2. Install an operating system.
  3. Install GuestTools and other software.
  4. Prepare the operating system.
  5. Create a system template.

The following details the whole process of how to encapsulate a Windows Server 2008 R2 template.


Add an Image

Add a Windows Server 2008 R2 image to ZStack Cloud. This image is used to install the operating system.

On the main menu of ZStack Cloud, choose Resource Center > Resource Pool > Compute Configuration > Image. On the Image page, click Add Image. Then, the Add Image page is displayed. On the Add Image page, set the following parameters:
  • Name: Enter a name for the image.
  • Description: Optional. Enter a description for the image.
  • Image Type: Select an image type. Here, select system template.
  • Image Format: Select an image format. Here, select iso.
  • CPU Architecture: Select a CPU architecture for the image. VM instances created from the image use this CPU architecture.
    Note: If you select aarch64 or mips64, set the BIOS mode to UEFI.
  • Platform: Select an image platform. Here, select Windows.
  • OS: Select an operating system that is consistent with the image.
  • VirtIO: Disable Virtio.
  • Backup Storage: Select a backup storage.
  • Image Path: Specify an image URL or upload a local file.
    Note:
    • The URL can be either in the HTTP/HTTPS/FTP/SFTP format or the file:/// format. Currently, the file:/// format supports only ImageStorage backup storages.
    • To upload a local file, make sure that this file can be accessed by your browser. ImageStore backup storages are supported.
  • BIOS Mode: Select a BIOS mode, including Legacy or UEFI. Default mode: Legacy.
    • Legacy: This mode supports all operating systems.
    • UEFI: This mode supports Windows 7, Windows Server 2008 R2, Windows 8, and their later versions.
      Note:
      • For a Windows-based VM instance (such as Windows Server 2012 R2, Windows Server 2016, and Windows 10) booted by UEFI, the following page will be displayed after the VM instance starts. Press any key to continue the installation of the VM operating system. Otherwise, the VM instance will enter the UEFI Shell.
        Figure 1. Press Any Key to Continue


        If the VM instance already entered the UEFI Shell, you must run the following commands before you boot the operating system.
        Shell> fs0: FS0:\> dir FS0:\> cd EFI FS0:\EFI\> cd BOOT FS0:\EFI\BOOT\> BOOTX64.EFI
        After you perform the preceding operations, press any key to continue the VM operating system installation. Otherwise, the VM instance will enter the UEFI Shell again.
Figure 2. Add Windows Image


Install an Operating System

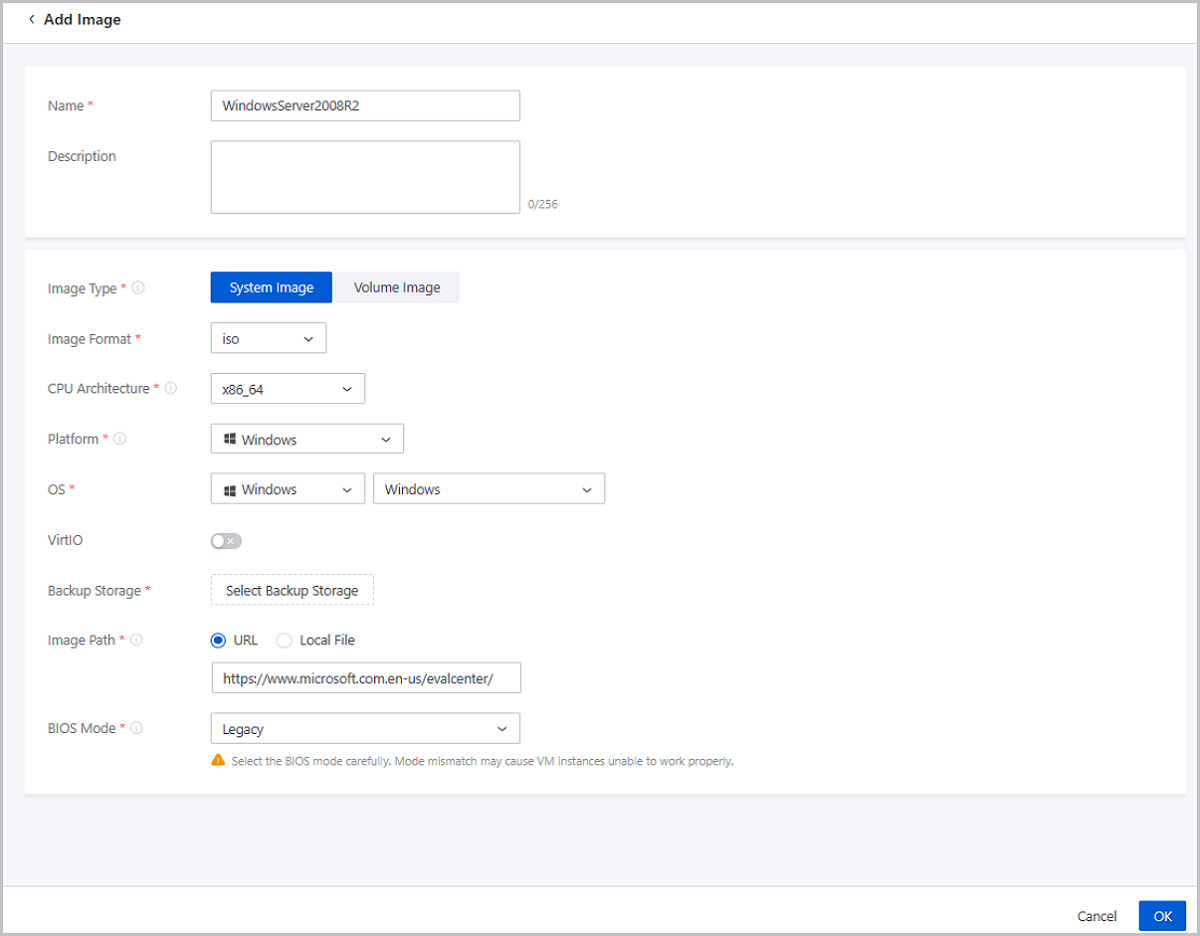
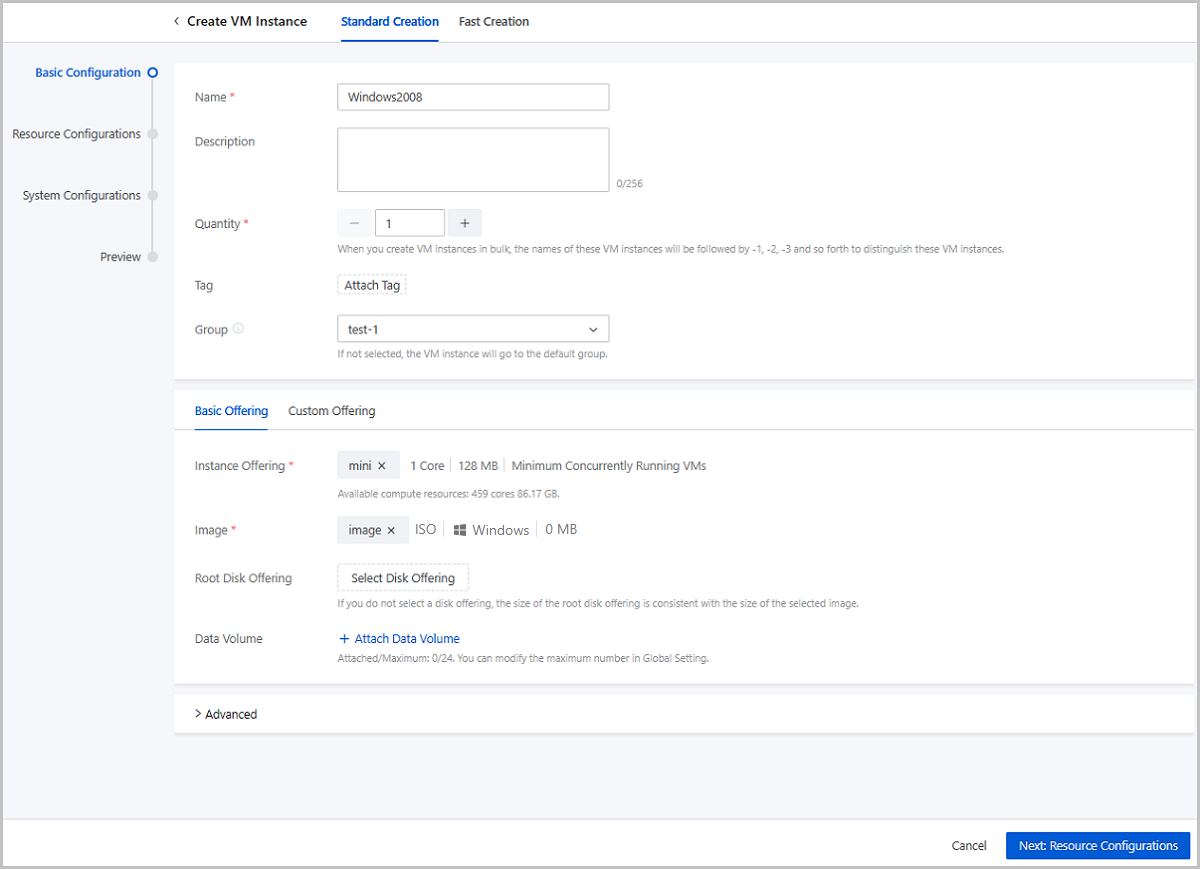
Create a VM instance and install the operating system by using the Windows Server 2008 R2 image you added in the previous step.

Create a VM Instance

On the main menu of ZStack Cloud, choose Resource Center > Resource Pool > Virtual Resource > VM Instance. On the VM Instance page, click Create VM Instance. On the displayed, click on Standard Creation. Then, follow these steps to create a VM instance.
  1. Complete the basic configurations.
    Set the following parameters:
    • Name: Enter a name for the VM instance.
    • Description: Optional. Enter a description for the VM instance.
    • Quantity: Enter the number of VM instances to be created. You can create VM instances in bulk.
    • Tag: Optional. Bind one or more tags to the VM instance.
    • Group:Choose a group for the VM instance. If not selected, the VM instance will go to the default group.
    • Set the VM offering by using one of the following methods:
      • Basic Offering: Set the VM offering by selecting an existing instance offering and disk offering.
        • Instance Offering: Select an existing instance offering.
        • Image: Select an existing image.
        • Data Volume: Optional. Choose whether to create a data volume and attach it to the VM instance. Here, you do not need to create a data volume.
      • Custom Offering: Set the VM offering by customizing the following VM configurations:
        • CPU: Set the number of CPU cores of the VM instance.
        • Memory: Set the memory size of the VM instance.
        • Image: Select an existing image.
        • Data Volume: Optional. Choose whether to create a data volume and attach it to the VM instance. Here, you do not need to create a data volume.
  2. Complete the resource configurations.
    Set the following parameters:
    • Network Configurations: Select an L3 network used by the VM instance and complete the network configurations.
      • Network: Select an L3 network used by the VM instance. Supported network types: public network, flat network, and VPC network.
      • Make Default: If you add multiple network configurations, set one of the networks as the default network.
      • Enable SR-IOV: Optional. Choose whether to use SR-IOV to generate a VF NIC and pass it through to the VM instance.
      • Assign IP: Optional. Choose whether to assign an IP address to the VM NIC.
      • MAC Address: Optional. Choose whether to configure a MAC address for the VM instance.
      • Security Group: Optional. Associate a security group with the VM instance.
    • Cluster: Optional. Specify a cluster for the host on which the VM instance is to be started.
    • Storage Allocation Policy: Specify how the Cloud allocates a primary storage.
    • Host: Optional. Select the host on which the VM instance is to be started. If you specified a cluster, select a host from the cluster.
    • vDrive: Optional. Add a virtual drive (vDrive) for the VM instance.
    • GPU: Add a GPU device for the VM instance by specifying a GPU specification or device. The GPU device can be either a physical GPU (pGPU) or a virtual GPU (vGPU).
    • CPU Pinning: Specify the association between the pCPU of the host and the vCPU of the VM instance. Then, the Cloud allocates a pCPU to the VM instance accordingly. This helps to improve the VM performance.
  3. Complete the system configurations.
    Set the following parameters:
    • SSH Login Mode: Optional. Set the SSH login mode.
    • Hostname: Set a hostname for the VM instance.
    • User Data: Optional. Inject user-defined parameters or scripts to customize configurations for the VM instance or to accomplish specific tasks.
    • Console Password: Set a console password for the VM instance.
    • Console Mode: Set the console mode. Options: VNC, SPICE, and VNC+SPICE. Default: VNC.
  4. Confirm the information.

    View the information about the VM instance. You can edit the information by clicking the Edit icon.

On the Preview page, click OK. Then, the Windows Server 2008 VM instance is created. The operating system will automatically enter the BIOS mode.

Figure 1. Create VM Instance


Install the Operating System

On the VM Instance page, select the VM instance you created before, and launch the VM console. Then, the installation page appears.

Figure 2. Install Operating System


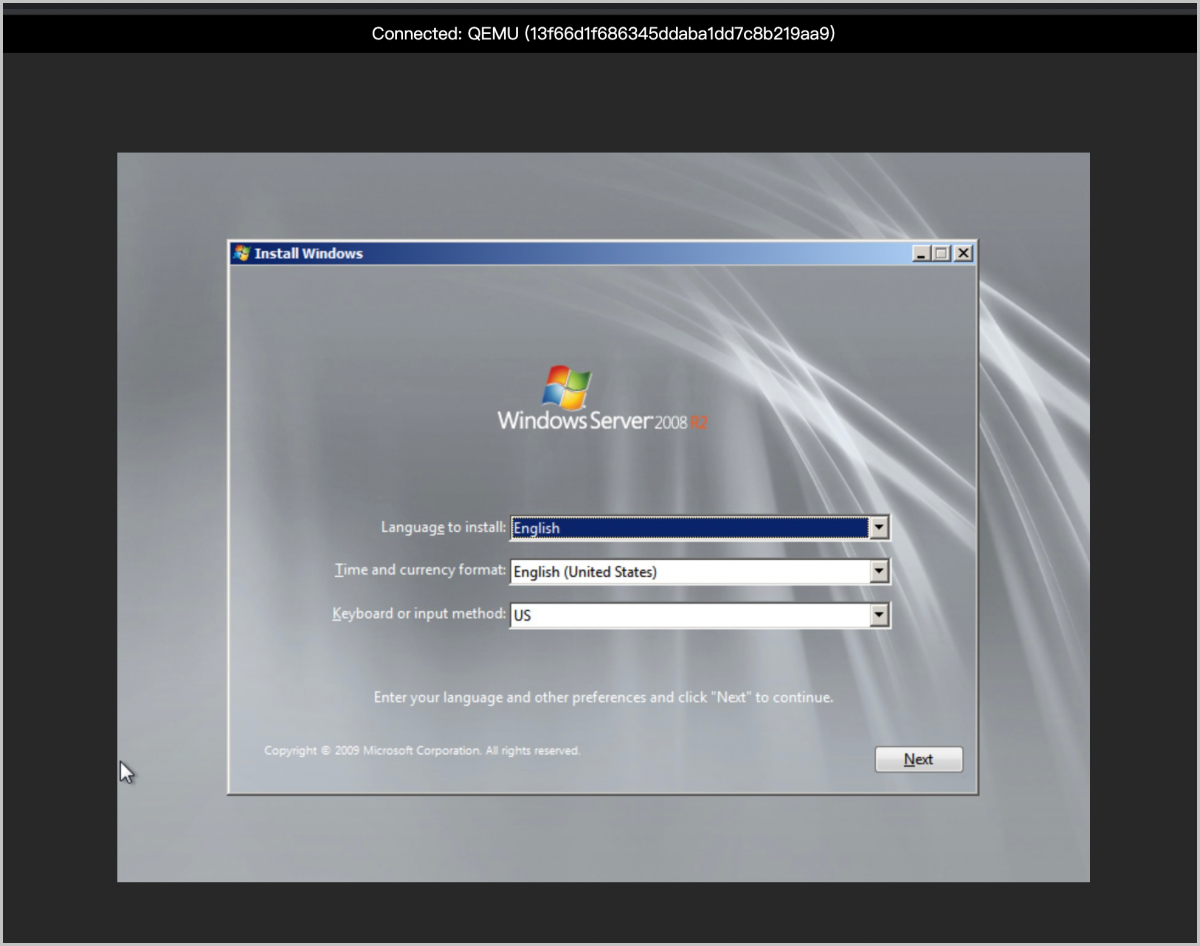
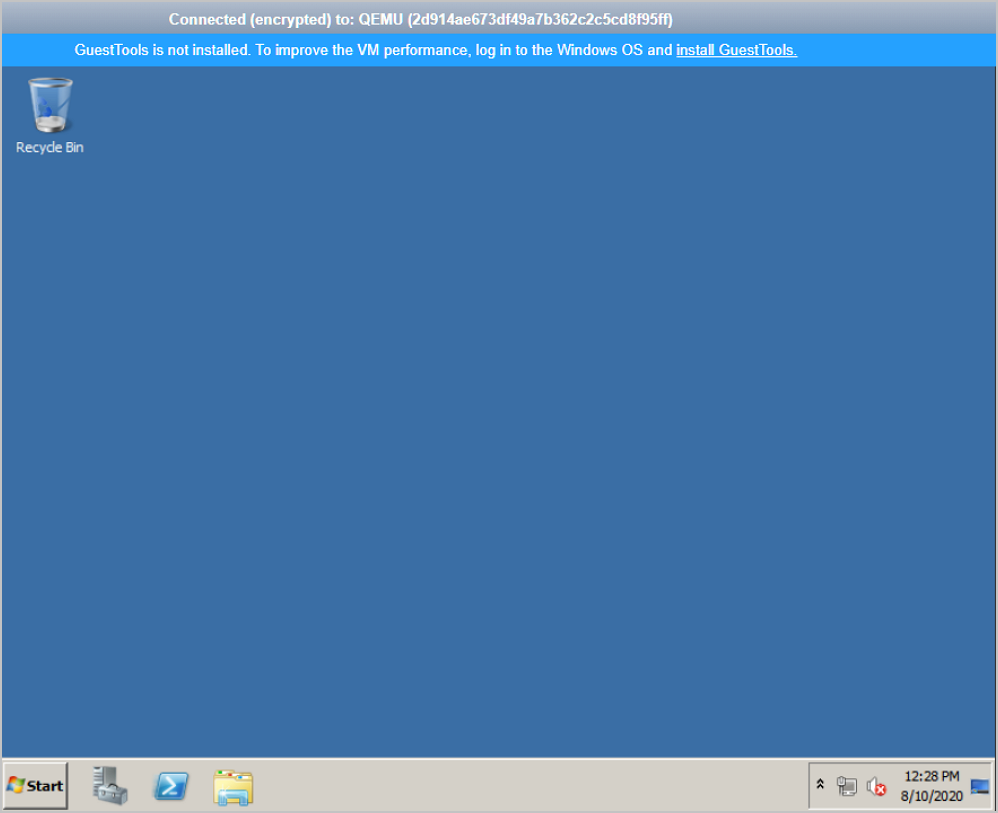
Complete the configurations by referencing to the common installation process of Windows Server 2008 R2. During the installation, the operating system will be automatically rebooted, due to which the console might be disconnected. In that case, launch the console again. After you complete installing the operating system, set the admin password and log in to the operating system. So far, the Windows operating system is installed.

Figure 3. Complete Installing Operating System


Prevent Disk from Being Offline

If the server is abnormally shut down, disks on the VM instance might be offline after the VM instance reboots. To prevent this, after you complete installing the Windows operating system, go to Command Prompt as an Administrator, and run the following commands successively.
C:\Users\Administrator> diskpart  ::Enter diskpart. DISKPART> san   ::View the SAN policy. DISKPART> san policy=onlineall   ::Change the SAN policy by using diskpart. DISKPART> exit


Back to Top

Download

Already filled the basic info?Click here.

Enter at least 2 characters.
Invalid mobile number.
Enter at least 4 characters.
Invalid email address.
Wrong code. Try again. Send Code Resend Code (60s)

An email with a verification code will be sent to you. Make sure the address you provided is valid and correct.

同意 不同意

I have read and concur with the Site TermsPrivacy PolicyRules and Conventions on User Management of ZStack Cloud

Download

Not filled the basic info yet? Click here.

Invalid email address or mobile number.
同意 不同意

I have read and concur with the Site TermsPrivacy PolicyRules and Conventions on User Management of ZStack Cloud

Email Us

contact@zstack.io
ZStack Training and Certification
Enter at least 2 characters.
Invalid mobile number.
Enter at least 4 characters.
Invalid email address.
Wrong code. Try again. Send Code Resend Code (60s)

同意 不同意

I have read and concur with the Site TermsPrivacy PolicyRules and Conventions on User Management of ZStack Cloud

Email Us

contact@zstack.io
Request Trial
Enter at least 2 characters.
Invalid mobile number.
Enter at least 4 characters.
Invalid email address.
Wrong code. Try again. Send Code Resend Code (60s)

同意 不同意

I have read and concur with the Site TermsPrivacy PolicyRules and Conventions on User Management of ZStack Cloud

Email Us

contact@zstack.io

The download link is sent to your email address.

If you don't see it, check your spam folder, subscription folder, or AD folder. After receiving the email, click the URL to download the documentation.

The download link is sent to your email address.

If you don't see it, check your spam folder, subscription folder, or AD folder.
Or click on the URL below. (For Internet Explorer, right-click the URL and save it.)

Thank you for using ZStack products and services.

Submit successfully.

We'll connect soon.

Thank you for using ZStack products and services.