Environment Preparations

To install or upgrade ZStack Cloud, you need to prepare the ISO of ZStack Cloud:
  1. ZStack Cloud ISO is built on Helix, a self-made virtualization kernel software that operates between the infrastructure layer and the upper-layer operating systems. It integrates essential components like hardware drivers, macro kernels, and virtual agents, shielding the differences among heterogeneous hardware. This releases operating systems from hardware driver dependencies, ensuring proper access to the heterogeneous hardware on the under layer. By doing so, Helix enhances hardware compatibility, high reliability, high availability, scalability, and performance of your virtual environment.
  2. Three ISO versions of ZStack Cloud are available:
    • h79c: ZStack-Cloud-x86_64-DVD-4.8.0-h79c.iso
    • h76c: ZStack-Cloud-x86_64-DVD-4.8.0-h76c.iso
    • h84r:Contact the official technical support to get this ISO.
    Note:
    • For the first installation of ZStack Cloud, we recommend that you use ISO of the h79c version.. If you have deployed ZStack Cloud, you can upgrade the Cloud to the latest of the same ISO version. For more information, see Upgrading Tutorial.
    • Starting from the version 4.7.21, ZStack Cloud provides 3 versions of ISO: h76c ISO, h79c ISO, and h84r ISO. The h84r ISO need to be got from official technical support.
    • Starting from the version 4.7.0, ZStack Cloud provides ISO based on Helix, a self-made virtualization kernel software. Currently, two ISO versions are available: h76c and h79c. The ISO of the c76 and c79 is no longer provided. You can use an h76c or h79c ISO to upgrade a Cloud installed before to the latest version.
    • Starting from the version 4.6.0, ZStack Cloud custom ISO of the c74 version is no longer available. If you have deployed the ISO of the c74 version, contact the technical support for upgrading.
    • Starting from the version 3.7.1, ZStack Cloud custom ISO of the c72 version is no longer available. If you have deployed the ISO of the c72 version, contact the technical support for upgrading.
  3. ZStack Cloud allows for offline installation. You do not need to connect to the public network or configure the local repo.
  4. The following installation modes are available: Tenant Management Node , Community Management Node, Compute Node, Expert Mode, and Simplified Expert Mode. You can select a mode based on your business needs.
  5. Default settings: DATE&TIME: Asia/Shanghai timezone. LANGUAGE SUPPORT: English (United States). KEYBOARD: English (US).
The initial installation of h76c ISO, h79c, and h84r ISO basically is the same. This topic takes h76c ISO as an example to describe the installation process.
  1. Prepare files.
  2. Write the image.
  3. Install the operating system.
  1. Prepare files.
    Before you install ZStack Cloud, prepare the following packages for installation and deployment:
    • ZStack Cloud custom ISO:
      • h79c: ZStack-Cloud-x86_64-DVD-4.8.0-h79c.iso
      • h76c: ZStack-Cloud-x86_64-DVD-4.8.0-h76c.iso
      • Download address: Click here
    • ZStack Cloud installation package:
      • Software: ZStack-Cloud-installer-4.8.0.bin
      • Download address: Click here
    Note: After you download the software packages, check the MD5 hash by using a MD5 checker to verify software integrity.
  2. Use Rufus to burn the ISO image file to a U disk.
    1. Use Rufus to open the ISO image file.

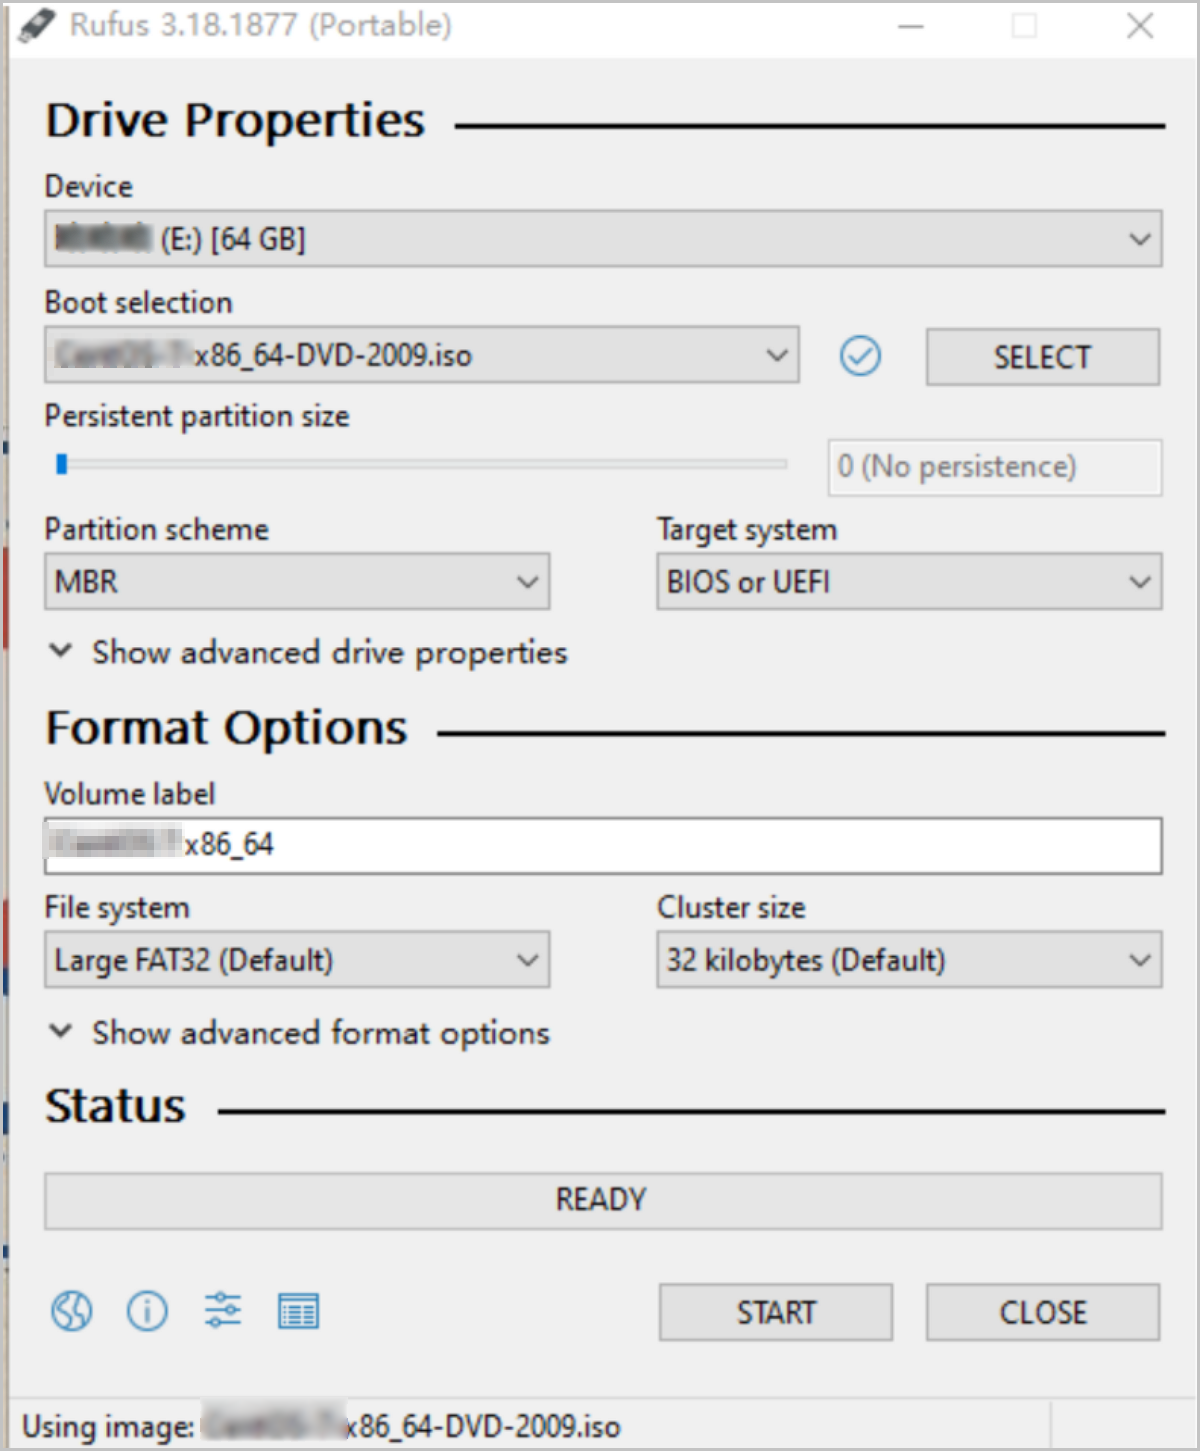
      Open Rufus, select Disk or ISO image (Please select) from the Boot selection drop-down list, and click the Select button to open the downloaded ISO image file.

      Figure 1. Use Rufus to Open ISO Image File


    2. Write the image.

      After you select the ISO image, keep the default settings for the remaining options and click Start to write the image.

      Figure 2. Write Disk Image on Rufus


    3. After you click Start, you will be reminded of the risk that the disk data will be formatted. Click OK to burn the image file.
      Note: Before you burn the image file, make sure that you backup the data on the U disk.
      Figure 3. Confirm to Write ISO Image on Rufus


    4. Then the U disk is used as the startup disk. This disk supports the Legacy and UEFI boot modes.
  3. Install the operating system.
    1. Configure the server.
      • Make sure that the data on the disks of the server is backed up. The data will be overwritten during installation.
      • Enter BIOS and enable the virtualization technology and hyper-threading options for CPU.
      • Enter the RAID configuration page and configure the RAID level to provide a data redundancy mechanism that suits your business needs.
      • Place the system startup disk in the first boot order.
    2. Select the boot item.

      On the ISO system boot interface, select the default option and then install the operating system.

      Figure 4. System Boot


      Note:
      • ZStack Cloud provides the following installation methods: (graphic user interface) GUI, virtual network computing (VNC), and character user interface (CUI). We recommend that you use GUI to install the operating system.
      • If the server does not have a VGA connector and only supports serial communication, you can use the VNC or CUI method.
    3. Installation configuration summary

      The following figure displays system installation configurations. You can specify the configurations based on your needs. The default settings provided by ZStack Cloud are as follows:

      • DATE&TIME: Asia/Shanghai timezone. We recommend that the admin checks the host time and sets to the current timezone and time.
      • LANGUAGE: English (United States).
      • KEYBOARD: English (US).
      Figure 5. System Installation Interface


    4. Select the installation mode.

      On the INSTALLATION SUMMARY page, click SOFTWARE SELECTION to enter the SOFTWARE SELECTION page. Select an installation mode on the page.

      ZStack Cloud provides the following installation modes:
      • ZStack Enterprise Management Node
        Note: We recommend that you select this mode in the initial installation.
      • ZStack Community Management Node
      • ZStack Compute Node
      • ZStack Expert Mode
        Note:
        • If you select this mode, after the system is installed, you are redirected to the terminal where you can customize installation of the cloud platform. If you select other modes, after the system is installed, the system automatically installs the cloud platform in the selected mode.
        • No ZStack Local Repo: simplified installation. If you select this item, the ISO image file is not copied during installation and internal repo is not generated.
      Figure 6. Select Installation Mode


    5. Configure disk partitioning.

      On the INSTALLATION SUMMARY page, click INSTALLATION DESTINATION to enter the INSTALLATION DESTINATION page.

      Figure 7. Default Disk Partitioning


      Note: We recommend that you only configure the system disk on the page. After the system is installed, you can configure other disks.
      ZStack Cloud sets partitioning to Automatically configure partitioning by default. If you want to customize partitioning, set the parameters based on the BIOS boot mode:
      • UEFI mode
        • /boot: stores the core files required for Linux startup. We recommend that you distribute 1 GB to the directory.
        • /boot/efi: stores UEFI boot file. We recommend that you distribute 500 MB to the directory.
        • swap: swap. We recommend that you distribute 32 GB to the swap.
        • /: Linux system root. We recommend that you distribute the rest of the space to the directory.
      • Legacy mode
        • /boot: stores the core files required for Linux startup. We recommend that you distribute 1 GB to the directory.
        • swap: swap. We recommend that you distribute 32 GB to the swap.
        • /: Linux system root. We recommend that you distribute the rest of the space to the directory.
      Note:
      • We recommend that the total disk capacity for ZStack Cloud be greater than 300 GB.
      • In Legacy mode, if the capacity of the system disk is greater than 2 TB, you need to configure the BIOS boot partition for the support of the GPT partition. In UEFI mode, you do not need to configure this item and the GPT partition is supported.
    6. Configure the network.
      This step describes how to configure a static IP address for a NIC and enable auto-activation of NIC. This configuration is used only for proof of concept (POC). In the production environment, we recommend that you configure NIC bonding. For more information, see Network Bonding (Optional).
      1. Configure a static IP address.
        1. On the INSTALLATION SUMMARY page, choose NETWORK & HOST NAME > Ethernet (eth0) > Configure.... Then the Editing eth0 page is displayed. On the page, choose IPv4 Settings > Method > Manual. Then you can manually assign an IP address.
          Note: You can also use DHCP to automatically obtain an IP address.
        2. Click Add to add an IP entry, configure the IP address, subnet, and gateway, and then click save to save the configurations.
          Figure 8. Configure Static Address


      2. Configure NIC auto-activation.

        On the Editing eth0 page, choose General > Automatically connect to this network when it is available > Save. Then the auto-activation is enabled.

        Figure 9. Configure NIC Auto-Activation


    7. Start installation.

      Go back to the INSTALLATION SUMMARY page, click Begin Installation to install the operating system.

    8. Set a password.

      When the installation is in progress, click ROOT PASSWORD to set a root password.

      Figure 10. Set Password


    9. Enter the system.

      After the system is installed, click Restart and enter the custom system of ZStack Cloud.


Network Bonding (Optional)

This topic describes how to configure network bonding. You can use this method when you want to install and deploy ZStack Cloud in your production environments. ZStack Cloud supports IEEE 802.3ad for link aggregation.

You can configure network bonding by using command line tool or GUI.

Command Line Tool

After you complete installing ZStack Cloud, you can configure network bonding by running the following commands according to your deployment requirements:
# Create a link aggregation virtual interface in LACP mode zs-bond-lacp -c [bond-name] zs-bond-lacp -c bond0  # Create another link aggregation virtual interface in active-backup mode zs-bond-ab -c [bond-name] zs-bond-ab -c bond0  # Bind the physical interface to the link aggregation interface zs-nic-to-bond -a [bond-name] [nic-name] zs-nic-to-bond -a bond0 eth0  # Create a VLAN interface zs-vlan -c [nic-name] [vlan] zs-vlan -c bond0 10  # Create a network bridge, and configure the network IP address for the network bridge zs-network-setting -b [interface] [ipaddress] [netmask] [gateway] zs-network-setting -b bond0.10 192.168.1.10 255.255.255.0 192.168.1.1

GUI

When you install the operating system, you can configure network bonding by using the GUI. The following lists the process of network bonding:
  1. Add a bond device.
  2. Add a bond slave.
  3. Select a bond mode.
  4. Disable IPv4 settings of original NIC.
  5. Complete the NIC bonding configurations.
  6. Configure static IP address for the bond.
  7. Configure NIC auto-activation.
  1. Add a bond device.

    On the INSTALLATION SUMMARY page, choose NETWORK & HOST NAME > Ethernet (eth0) > Configure.... Then the eth0 configuration page is displayed. Click the plus sign (+) at the lower left, select Bond from the prompted Add device drop-down list, and click Add.

    Figure 1. Add Bond Device


  2. Add a bond slave.
    1. On the bond configuration page, click Add to add a bond slave.
      Figure 2. Add Bond Slave


    2. On the displayed Choose a Connection Type page, choose a bond slave connection type from the drop-down list, for example, Ethernet and then click Create...
      Figure 3. Choose Bond Slave Connection Type


    3. On the Ethernet tab of the Editing bond0 slave1 page, select a bond slave device from the Device drop-down list, for example, eth0 (MAC address). Then, configure settings or use the default settings for the other parameters. After you complete the settings, click Save.
      Figure 4. Select Bond Slave Device


  3. Select a bond mode.

    From the Mode drop-down list of the Bond tab, select the bond mode as need, such as Active backup. Then, configure settings or use the default settings for the other parameters. After you complete the settings, click Save.

    Figure 5. Select Bond Mode


  4. Disable the IPv4 settings of the original NIC.
    • On the Ethernet (eth0) page, choose Configure... > IPv4 Settings. On the tab, set Method to Disabled and then click Save.
    • Figure 6. Disable IPv4


  5. Complete the network bonding configurations.
    Note:

    Make sure that you turn on the On switch on the bond configuration tab and configure the IP address. In addition, make sure that you turn on the On switch for the bond slave, for example, eth0. Otherwise, you might fail to install ZStack Cloud properly.

    Figure 7. Complete NIC Bonding


  6. Configure a static IP address for bond device
    1. On the INSTALLATION SUMMARY page, choose NETWORK & HOST NAME > Bond (bond0) > Configure.... Then the Bond (bond0) page is displayed. On the page, choose IPv4 Settings > Method > Manual. Then you can manually assign an IP address.
      Note: You can also use DHCP to automatically obtain an IP address.
    2. Click Add to add an IP entry, configure the IP address, subnet, and gateway, and then click save to save the configurations.
  7. Configure NIC auto-activation.
    On the Bond (bond0) page, choose General > Automatically connect to this network when it is available > Save. Then the auto-activation is enabled.
    Figure 8. Configure NIC Auto-Activation


Install ZStack Cloud

This topic describes the installation mode of ZStack Cloud 4.8.0.

ZStack Cloud Custom ISO Installation Mode

ZStack Cloud ISO provides the following installation modes:
  • Enterprise Management Node Mode
  • Community Management Node Mode
  • Compute Node Mode
  • Expert Mode
The following describes the installation process in different modes:
  1. Enterprise Management Node Mode
    • Install the basic system.
    • Install dependencies such as MariaDB and CloudBus.
    • Auto-install and start ZStack Cloud
  2. Community Management Node Mode
    • Install the basic system.
    • Install dependencies such as MariaDB and CloudBus.
    • Auto-install and start ZStack Cloud
    Note:
    • The Enterprise Management Node Mode is different from the Community Management Node Mode in terms of the license type, which decides the features available on the Cloud.
    • The Enterprise Management Node Mode is the same as the Community Management Node Mode in terms of the installation process.
  3. Compute Node Mode
    • Install the basic system.
    • Install virtualization components such as libvirt and QEMU.
  4. Expert Mode
    • Install the basic system.
    Note:
    • The expert mode is basically the same as the minimum installation mode.
    • If an admin needs deep customization, the admin can select the Expert Mode and manually customize into one of the other three modes.
Different installation modes are applied to different installation scenarios.
Table 1. Installation Scenarios
Mode Scenario
Enterprise Management Node Mode Applicable only to the installation of management nodes of the Enterprise edition.
Community Management Node Mode Applicable only to the installation of management nodes of the Community edition.
Compute Node Mode
Applicable to the installation of all nodes except the management nodes, such as
  • Compute node
  • ImageStore, Ceph backup storage node, and Ceph backup storage mount node
  • Ceph primary storage node, and Ceph primary storage mount node
  • PXE deployment server node, local backup server node, and remote backup server node in another data center
Expert Mode


Back to Top

Download

Already filled the basic info?Click here.

Enter at least 2 characters.
Invalid mobile number.
Enter at least 4 characters.
Invalid email address.
Wrong code. Try again. Send Code Resend Code (60s)

An email with a verification code will be sent to you. Make sure the address you provided is valid and correct.

同意 不同意

I have read and concur with the Site TermsPrivacy PolicyRules and Conventions on User Management of ZStack Cloud

Download

Not filled the basic info yet? Click here.

Invalid email address or mobile number.
同意 不同意

I have read and concur with the Site TermsPrivacy PolicyRules and Conventions on User Management of ZStack Cloud

Email Us

contact@zstack.io
ZStack Training and Certification
Enter at least 2 characters.
Invalid mobile number.
Enter at least 4 characters.
Invalid email address.
Wrong code. Try again. Send Code Resend Code (60s)

同意 不同意

I have read and concur with the Site TermsPrivacy PolicyRules and Conventions on User Management of ZStack Cloud

Email Us

contact@zstack.io
Request Trial
Enter at least 2 characters.
Invalid mobile number.
Enter at least 4 characters.
Invalid email address.
Wrong code. Try again. Send Code Resend Code (60s)

同意 不同意

I have read and concur with the Site TermsPrivacy PolicyRules and Conventions on User Management of ZStack Cloud

Email Us

contact@zstack.io

The download link is sent to your email address.

If you don't see it, check your spam folder, subscription folder, or AD folder. After receiving the email, click the URL to download the documentation.

The download link is sent to your email address.

If you don't see it, check your spam folder, subscription folder, or AD folder.
Or click on the URL below. (For Internet Explorer, right-click the URL and save it.)

Thank you for using ZStack products and services.

Submit successfully.

We'll connect soon.

Thank you for using ZStack products and services.