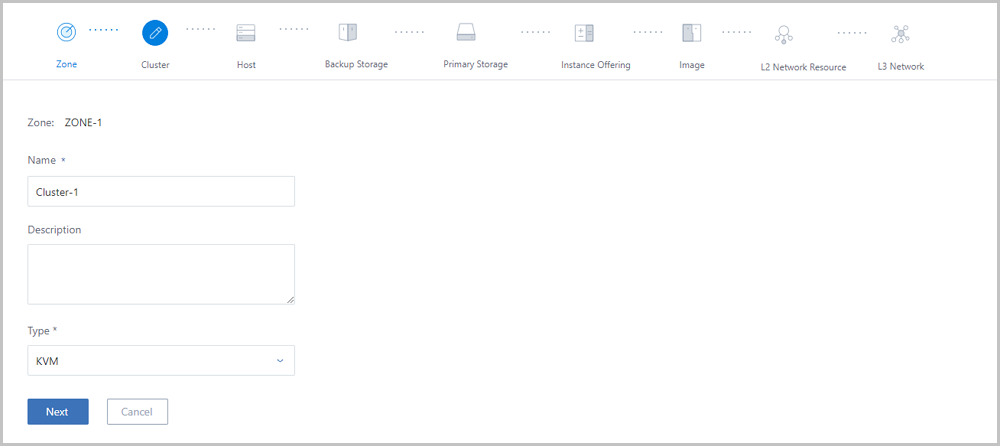
Initialize the Environment According to Wizard

If you are logging in to ZStack for the first time, you will be guided by the wizard to initialize the basic environment of ZStack Private Cloud in the UI.
Note:
  • If the initialization process is interrupted, or if you deleted key resources during initialization, the wizard would not be displayed again.
  • We recommend that you complete the configuration of the ZStack basic environment according to the wizard.
  1. Create a zone.
    As shown in Create Zone.
    Figure 1. Create Zone


  2. Create a cluster.
    As shown in Figure 2.
    Figure 2. Create Cluster


  3. Add a host.

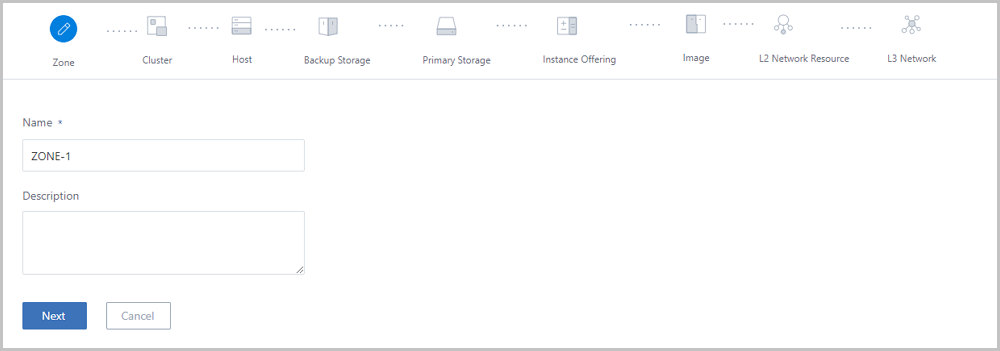
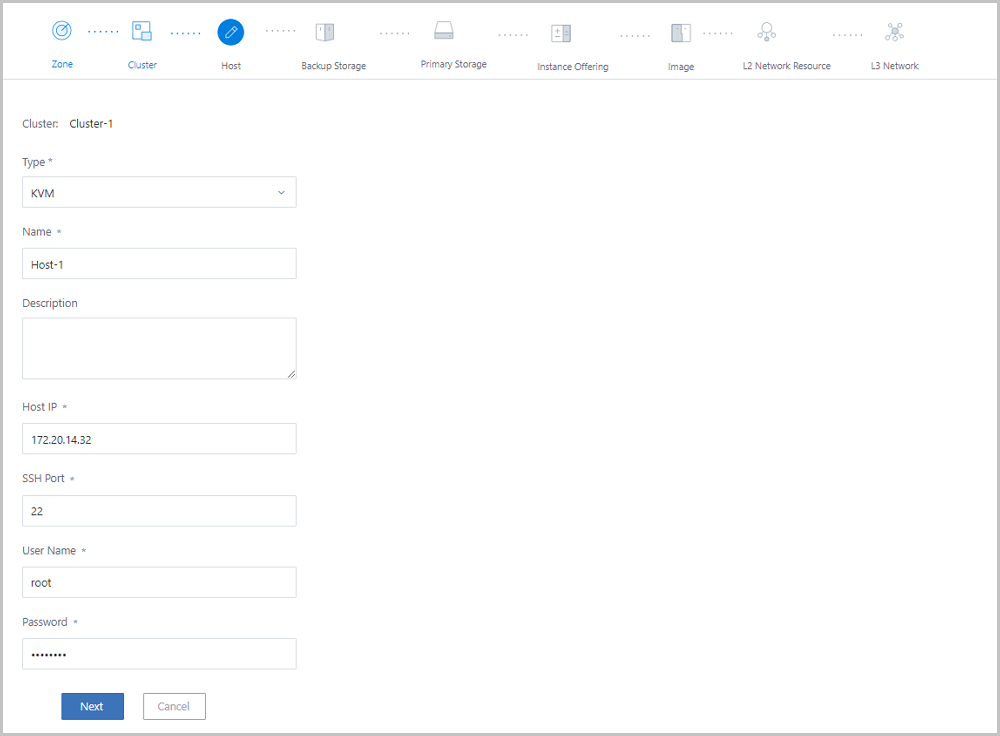
    Enter the host name, IP address, SSH port No., root user name, and root password.

    As shown in Figure 3.
    Figure 3. Add Host


  4. Add a backup storage.

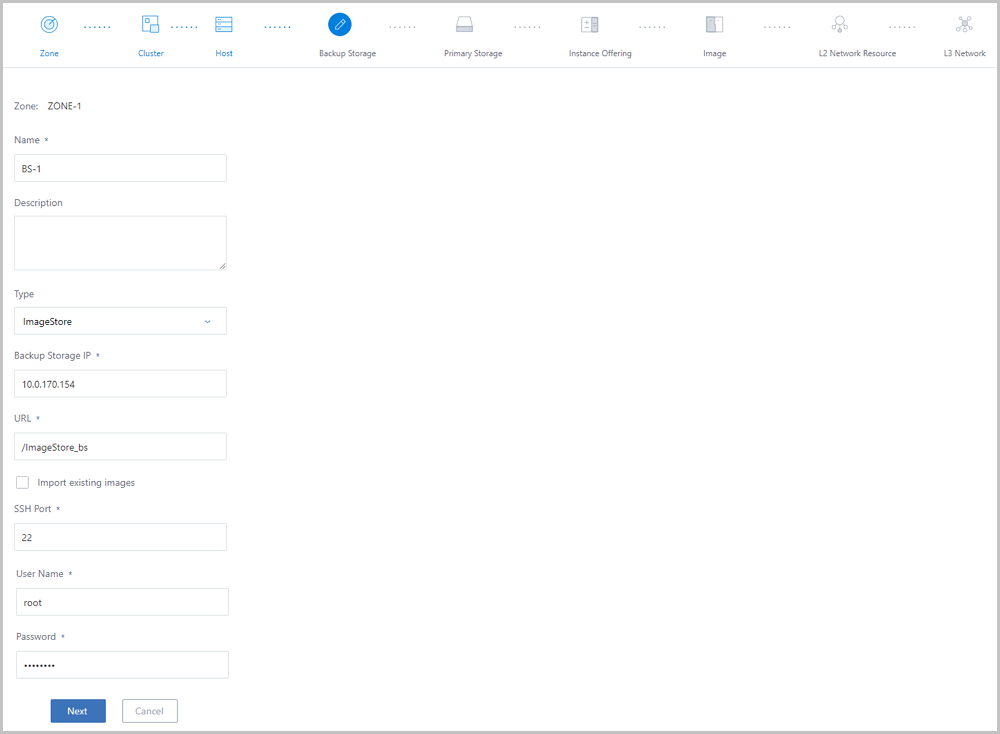
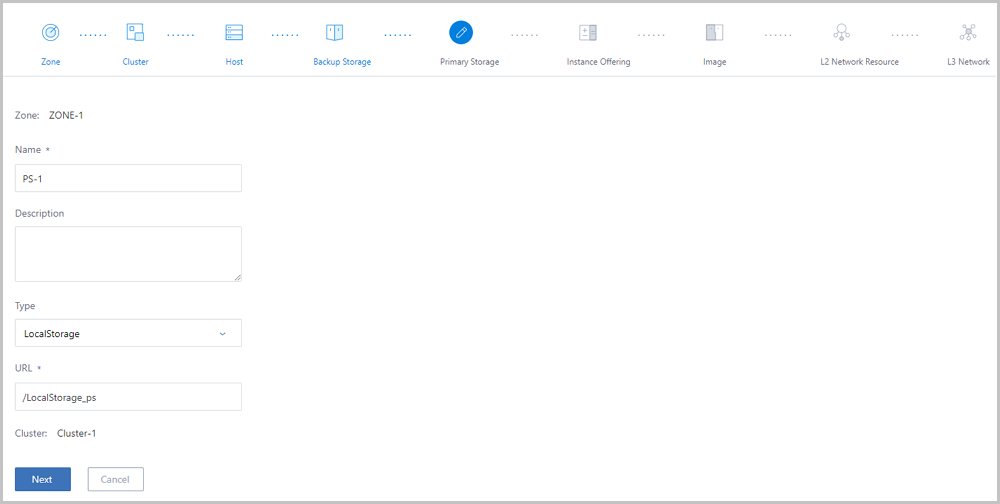
    Take the ImageStore as an example. Select ImageStore, enter the IP address of the target ImageStore (for example, the IP address of the current host ), and enter the URL, such as /zstack_bs.

    As shown in Figure 4.
    Figure 4. Add ImageStore Backup Storage


  5. Add a primary storage.
    Take the local storage as an example. Select LocalStorage, and set URL to a complete file path under the local directory of the host, such as /zstack_ps.
    As shown in Figure 5.
    Figure 5. Add Local Storage


  6. Create an instance offering.
    As shown in Figure 6.
    Figure 6. Create Instance Offering


  7. Add an image.
    As shown in Figure 7.
    Figure 7. Add Image


  8. Create an L2 network.
    Two L2 network modes are available: NoVlanNetwork and VlanNetwork.
    • If you select NoVlanNetwork, the switch port connected by the specified NIC must be in the Access mode.
    • If you select VlanNetwork, the switch port connected by the specified NIC must be in the Trunk mode.
    In this example, Bond0 is added as a logical NIC to support the data flows of VM instances.
    As shown in Figure 8.
    Figure 8. Create L2 Network


  9. Create an L3 network.

    The default network type is Flat Network. In this example, select IP Range to add the network range.

    As shown in Figure 9.
    Figure 9. Create L3 Network


  10. After all the resources are added, check the added CPU, memory, primary storage, backup storage, L2 network, L3 network, and other resources on the Home page.
    As shown in Figure 10.
    Figure 10. Home Page


Create VM Instance

After the initialization of ZStack is completed, all resources are ready. Then, you can create one or more VM instances as needed.
  1. Create VM instances.
    In the navigation pane of the ZStack Private Cloud UI, choose Resource Pool > VM Instance. On the VM Instance page, click Create VM Instance. On the displayed Create VM Instance page, set the following parameters:
    • Add Type: Select an add type to determine whether to create multiple VM instances at a time. Options: Single | Multiple. If you select Multiple, specify the number of VM instances to be created.
    • Name: Enter a name for the VM instance.
    • Description: Optional. Enter a description for the VM instance.
    • Instance Offering: Select an instance offering for creating a VM instance.
    • Image: Select an image for creating a VM instance. The image BIOS mode includes Legacy and UEFI.
      Note:
      • A VM instance inherits the BIOS mode of the image added to the VM instance.
      • You need to get the corresponding image ready, and select a proper BIOS mode. For more information, see Add Image.
      • You can change the BIOS mode on the VM details page. Exercise caution when you make any changes. The VM instance may fail to work properly if the BIOS mode does not match the VM instance. After you change the BIOS mode, restart the VM instance for the changes to take effect.
      • The Legacy mode is recommended when you create a VM instance. If you want to use the UEFI mode, we recommend that you select the corresponding image from the following list of operating system versions.
        Operating System BIOS Mode Supported Version
        Windows UEFI
        • Windows 8 or later versions
        UEFI (compatibility module)
        • Windows 7
        • Windows Server 2008 R2
        Linux UEFI
        • CentOS 7.2
        • CentOS 7.3
        • CentOS 7.4 or later versions
      • When you create a VM instance, a virtual drive (vDrive) will also be created by default. The relationship between different image formats and the default vDrive is as follows:
        • If you select a qcow2 image or raw image, the system will create an empty vDrive by default. To delete the vDrive, go to the Create VM Instance page and choose Advanced > vDrive.
        • If you select an ISO image, the system will create a vDrive by default and attach the ISO image to the vDrive. Note that this vDrive cannot be deleted on the Create VM Instance page by choosing Advanced > vDrive.
    • Root Disk Offering: Select a root disk size for the VM instance. This option displays only when you select an ISO image.
    • Network: Select a network for the VM instance. The required parameters are as follows:
      • L3 Network: Select a network for the VM instance, including private network, public network, and VPC network.
        Note: When you select an L3 network, note the following:
        • Each VM instance lets you add multiple networks, while each L3 network corresponds to one NIC.
        • If you choose an L3 network with the IPv4+IPv6 type, the VM instance will have the double stack NIC. That is, the same NIC can have two types of IP address: IPv4 and IPv6.
        • If you want to create VM instances by using a network with the IPv6 type or IPv4+IPv6 type, run the dhclient -6 NIC_NAME command to manually obtain an IP address.
        • We recommend that you use only one IPv6 IP address for a VM instance to avoid potential risks.
      • Set Default Network: If you add more than one L3 network, you can set the default network by selecting the radio button in front of the network name.
      • VM NIC Setting: Optional. Configure the IP address and MAC address for the VM instance.
        • By default, this checkbox is not configured. The system will automatically assign an IP address and an MAC address for the VM instance.
        • The NIC of the VM instance can be customized. That is, you can manually configure the IP address and MAC address. At this time, to ensure that your configurations are successful, avoid the IP conflicts.
          Note: If you create VM instances in bulk and specify an IP address, the start IP address will be started from the specified IP address by default. Then, IP addresses will be assigned to multiple VM instances continuously. When a specified IP address is occupied within the continuously assigned IP range, the corresponding VM instance will fail to be created.
      • Enable SR-IOV: Choose whether to enable SR-IOV.
        • By default, this checkbox is not selected, indicating that SR-IOV is not enabled. In this case, the VM instance that you created will have a vNIC attached.
        • If selected, SR-IOV is enabled. In this case, the VM instance that you created will have a VF NIC attached.
        Note: When you enable SR-IOV, note the following:
        • Only IPv4 networks support SR-IOV, but IPv6 or IPv4+IPv6 networks do not.
        • Verify that SR-IOV must be enabled for the L2 network that corresponds to the L3 network. Otherwise, SR-IOV might fail to be enabled.
        • After SR-IOV is enabled, make sure that the physical NIC corresponded by the L3 network has an available VF NIC. Otherwise, the VM instance might fail to be created.
        • If SR-IOV is enabled, NICs of the VM instances that were created by using a public network or a flat network do not support the network services such as security group and EIP. If the VM instances that were created by using the vRouter network or VPC network, their NICs do not support the security group network services.
    So far, the basic configuration for creating a VM instance is completed. The following image is an example of creating a VM instance by using the IPv4 network, as shown in Create VM Instance. Click OK to finish creating the VM instance.
    Figure 1. Create VM Instance


  2. After you create a VM instance, you can log in to the console of the VM instance, as shown in Log in to a VM Console.
    Figure 2. Log in to a VM Console


So far, this Guide introduced the whole quick start installation and usage for ZStack Custom ISO c76. For more information about the installation and deployment, see the installation and deployment topic in the User Guide.

Back to Top

Download

Already filled the basic info?Click here.

Enter at least 2 characters.
Invalid mobile number.
Enter at least 4 characters.
Invalid email address.
Wrong code. Try again. Send Code Resend Code (60s)

An email with a verification code will be sent to you. Make sure the address you provided is valid and correct.

Download

Not filled the basic info yet? Click here.

Invalid email address or mobile number.

Email Us

contact@zstack.io
ZStack Training and Certification
Enter at least 2 characters.
Invalid mobile number.
Enter at least 4 characters.
Invalid email address.
Wrong code. Try again. Send Code Resend Code (60s)

Email Us

contact@zstack.io
Request Trial
Enter at least 2 characters.
Invalid mobile number.
Enter at least 4 characters.
Invalid email address.
Wrong code. Try again. Send Code Resend Code (60s)

Email Us

contact@zstack.io

The download link is sent to your email address.

If you don't see it, check your spam folder, subscription folder, or AD folder. After receiving the email, click the URL to download the documentation.

The download link is sent to your email address.

If you don't see it, check your spam folder, subscription folder, or AD folder.
Or click on the URL below. (For Internet Explorer, right-click the URL and save it.)

Thank you for using ZStack products and services.

Submit successfully.

We'll connect soon.

Thank you for using ZStack products and services.