| Hardware | Configuration Requirements |
|---|---|
| CPU | Minimum 8 cores |
| Memory | Minimum 16 GB |
| Network | Minimum 1 Gigabyte NIC |
| Storage | Minimum 50 GB for the rest of storage spaces Note: You can modify the storage configuration according to the number of VM instances to be migrated. Note: You can modify the storage configuration according to the number of VM instances to be migrated. |
Note: The type of the V2V conversion host must be consistent with that of the source cloud platform.Note: A host cannot be used as both the VMware conversion host and the KVM conversion host at the same time.Note: During the V2V migrations process, the VM system and data will be cached to the V2V conversion host, and then imported to a destination primary storage.Note: Note: This parameter must be an integer. Unit: Kbps, Mbps, or Gbps. Range: 8 Kbps-32 Gbps.Note: This parameter must be an integer. Unit: Kbps, Mbps, or Gbps. Range: 8 Kbps-32 Gbps.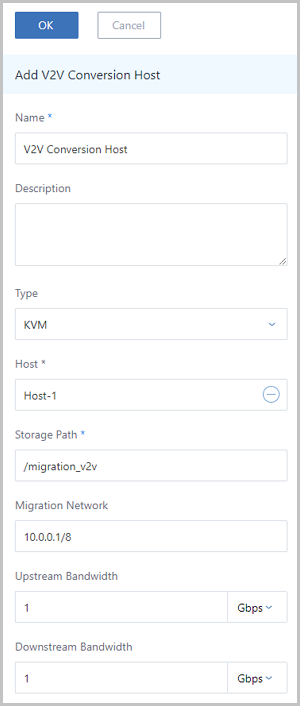 Note: Note: If you disable a V2V conversion host when you perform a V2V job, the job will not be affected.Note: If you delete a V2V conversion host, the running V2V jobs will be canceled automatically, but the resources that are migrated successfully will not be affected.
© 2023, Shanghai Yunzhou Information and Technology Ltd (云轴科技). All Rights Reserved.
Back to Top
Email Us
contact@zstack.ioEmail Us
contact@zstack.ioEmail Us
contact@zstack.ioThe download link is sent to your email address.
If you don't see it, check your spam folder, subscription folder, or AD folder. After receiving the email, click the URL to download the documentation.Thank you for using ZStack products and services.
Submit successfully.
We'll connect soon.Thank you for using ZStack products and services.

